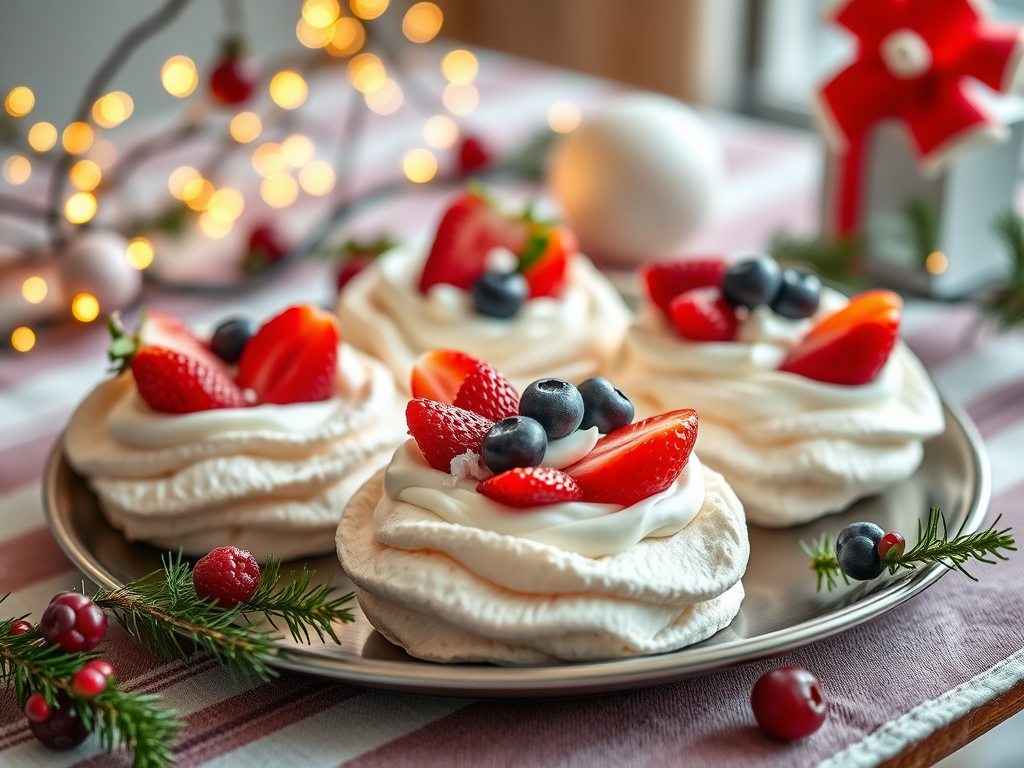
Because nothing says “Aussie Christmas” like a pav — especially one you can eat all by yourself.
🎄 A Festive Kitchen Tale
I don’t know about you, but Christmas desserts in Australia are a balancing act. You want something that looks stunning, tastes light, and won’t melt faster than your resolve not to eat seconds.
Enter these Mini Pavlova Nests with Peppermint Cream & Berries — sweet little meringue shells that are crisp on the outside, soft in the middle, and ridiculously easy to make. They look like they took hours, but they’re actually one of those “set it and forget it” bakes that make you feel like a domestic genius.
Even better, they’re perfect for one. You can make a small batch, enjoy one (or two) fresh, and keep the rest stored for future festive emergencies — like unexpected guests or a sudden craving for something sweet and crunchy at 9pm.
✨ Why You’ll Love This Recipe
- Light, airy, and festive: A classic pavlova, made mini.
- Simple ingredients: Just egg whites, sugar, and cream — nothing fancy.
- Make ahead: The nests last for days if stored properly.
- Customisable: Top with whatever berries or fruit you have on hand.
- Show-stopping: They look like something from a patisserie but take less effort than wrapping presents.
🍒 Ingredients (Makes 6–8 mini pavlovas)
For the pavlova nests:
- 2 large egg whites, room temperature
- ½ cup (110 g) caster sugar
- 1 tsp white vinegar
- 1 tsp cornflour
- ½ tsp vanilla extract
For the peppermint cream:
- ½ cup (125 ml) thickened cream
- ½ tsp peppermint essence (or to taste)
- 1 tsp icing sugar
For the topping:
- Fresh strawberries, raspberries, or blueberries
- Crushed peppermint candy (optional)
- Fresh mint leaves, to garnish
🥣 Step-by-Step Instructions
Step 1: Preheat and prep
Preheat oven to 120°C (fan-forced). Line a baking tray with parchment paper.
Step 2: Whip it good
In a clean, dry bowl, beat egg whites until soft peaks form. Gradually add sugar — one spoonful at a time — beating well after each addition until glossy, stiff peaks form (this should take around 5–6 minutes).
Step 3: Fold and shape
Gently fold in vinegar, cornflour, and vanilla. This gives your pavlovas that perfect chewy centre.
Spoon or pipe the mixture into 6–8 small nests on the tray (about 7 cm wide), leaving a little dip in the centre for the filling.
Step 4: Bake and dry out
Bake for 50–60 minutes until crisp and just starting to colour.
Turn off the oven, leave the door slightly ajar, and let the nests cool completely inside. This helps prevent cracks.
Step 5: Make the peppermint cream
Whip cream, peppermint essence, and icing sugar together until soft peaks form. Taste and adjust the peppermint — a little goes a long way!
Step 6: Assemble like a festive pro
Just before serving, spoon cream into each pavlova nest. Top with berries, a sprinkle of crushed peppermint candy, and a mint leaf or two.
🎁 Gifting & Sharing Ideas
These mini pavs are perfect for small get-togethers, neighbourly gestures, or solo indulgence.
- Festive platters: Arrange 6–8 nests on a large plate with scattered berries and mint — instant Christmas dessert.
- Giftable option: Package cooled meringue shells in a tin, and include a small jar of peppermint cream (labelled “keep chilled”).
- Solo snack prep: Keep the nests separate and assemble just one at a time for a little “dessert for one” magic.
❄️ Storage & Make-Ahead Tips
- Pavlova nests: Store in an airtight container at room temperature for up to 5 days.
- Peppermint cream: Keep covered in the fridge for up to 3 days.
- Assembled pavlovas: Best eaten immediately — once the cream hits the meringue, the clock starts ticking!
Freezer tip: You can freeze unfilled pavlova shells for up to 1 month — just thaw in the fridge before serving.
💡 Handy Swaps & Add-Ons
- Swap peppermint for lemon zest or vanilla for a more classic flavour.
- Try topping with passionfruit pulp for a tropical twist.
- Add a drizzle of melted white chocolate before topping with fruit for extra decadence.
- For a more “grown-up” version, add a splash of Baileys or peppermint liqueur to the cream.
❤️ Plan4One Takeaway
This recipe is everything I love about holiday cooking: simple ingredients, minimal fuss, and maximum joy. It’s light, festive, and feels just a little bit fancy — the kind of dessert that makes you stop and say, “Yep, Christmas has officially arrived.”
Whether you make them just for yourself or serve a few to friends, these mini pavs prove that the holidays don’t need a crowd to feel special — just a spoon, a smile, and maybe one more berry on top.
📣 Your Turn!
If you make these, I’d love to see your creations!
📸 Tag @Plan4One on Instagram or drop a photo in the comments to show off your festive flair.
And if you’ve missed the earlier recipes in this Christmas Baking Series, check out:
- 🥧 Mini Fruit Mince Pies for One (or to Share)
- 🍪 Spiced Gingerbread Biscuit Wreaths
- 🍒 Cranberry & White Chocolate Blondies
Stay tuned — I’ve got one last bonus treat coming soon: a Single-Serve Christmas Pudding Mug Cake for those of us who just want something cosy, quick, and festive in five minutes flat. 🎅